If you need an in-memory database through REST API that can load and aggregate external data into a single api with support for persistence to a json file, a middleware hook ready to log api requests while also updating your relational database, you might find this post interesting.
We all know database operations are costly and is always a good idea to have some sort of cache of it near our frontend application for faster access and operations and is also much better to have to interact with it through a rest api without the need to interact with all that drivers and connections stuffs.
What problem does i think it solve?This post is going to be a long one. I am going to show and talk about my open source project of an in-memory rest database made in NodeJS with no addition of external libraries so ever, just raw NodeJS to handle all API´s requests, that can be used for cache as a service, mock, database aggregator for a rest service and can even update your database with out-of-the-box support for a middleware hook so you can log operations in the api and handle database updates if you wish.
The hot feature for me is the out-of-the-box support for loading and converting a relational database into a rest service that you can access and update. In this version it came with support for adding mysql tables into a web api. You can even aggregate it with other sources of data like json files if you want and it was all thought with a repository pattern in mind so we can plug others vendors as well making it possible to aggregate different database sources. The next one will be PostgreSQL.
Project structure?
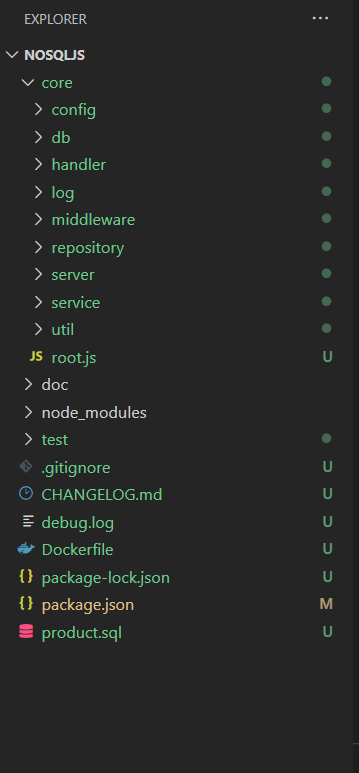
How does it work?
Since i will be running the mysql database in a docker, let´s start up our container and access its bash with the docker exec command so we can interact with the database client:docker run --rm --name mysql -e MYSQL_ROOT_PASSWORD=123456 -d -p 3306:3306 mysql:5.7 docker exec -it mysql bash
The reason i am doing this is because i want to load and make the database data available through a rest api. We will see how this is done later in this post.
We will see two different ways to create the database and mysql table. One way using the MySQL CLI and one using a schema file. To get access to the MySQL CLI enter the following command in the bash and type the same password provided in the docker run command:
mysql -u root -p
Next enter the following command to create our products database:
CREATE DATABASE products;
We can now switch to our newly cretaed database so we can create our table in it.
USE products;

CREATE TABLE Product (
    id int NOT NULL AUTO_INCREMENT,
    price float,
    date datetime,
    PRIMARY KEY (id)
);
The other way involves the creation of a Dockerfile with the following information:
FROM mysql:5.7

COPY ./product.sql /docker-entrypoint-initdb.d

ENV MYSQL_DATABASE=Products
ENV MYSQL_ROOT_PASSWORD=123456

EXPOSE 3307
Here we are copying our product schema file to the /docker-entrypoint-initdb.d. Every sql file we place there will be executed after the database is created with the provided MYSQL_DATABASE environment variable.
Run the following command to create an image based on our Dockerfile.
docker build -t cjafet/mysql .
Next, run our new image in the container:
docker run --rm --name mysql -p 3306:3306 cjafet/mysql
Now that we have our database ready, let´s run our tests to see if we are all good to go:
./node_modules/mocha/bin/mocha
Since all tests are passing let´s start our in-memory rest database server:
node ./server/nosql-server.js
Available endpoints
To get data from a table in the api you just need to specify its name in the following format:
http://host:port/getkey/table-name
Let´s try out making some GET and POST requests to see what we get from our newly created api.
This is how it works. Suppose we want to make a GET request to get all data imported from our product table into our rest api. In that case we would need to make a GET request to the following endpoint:
http://localhost:7700/getkey/product
To get all available data from our in-memory database we would simple have to make a GET request to the /get endpoint which in turn would return data with all of the availables tables from our in-memory database each one representing a different json property.
http://localhost:7700/get
You can also test all GET requests direclty from your browser.
Now let´s make a POST request to add a sales table to our in-memory database representing the sales of the products available into our api. This is how we should make a POST request to add it to our database:
POST /setkey/ HTTP/1.1
Host: localhost:7700
Content-Type: application/json

{
    "db": "sales",
    "data": [
        {
            "id": 1,
            "product-id": 100,
            "client-id": 1,
            "value": 100.89
        },
        {
            "id": 2,
            "product-id": 101,
            "client-id": 2,
            "value": 88.99
        },
        {
            "id": 3,
            "product-id": 102,
            "client-id": 3,
            "value": 29.99
        }
    ]
}
As you can see we just need to make a POST request with two json properties: db and data. One representing the table name and the other one representing your table data.
After the request your db.json file should look like this:

You should also be able to see the requested information logged in the logs.txt file:
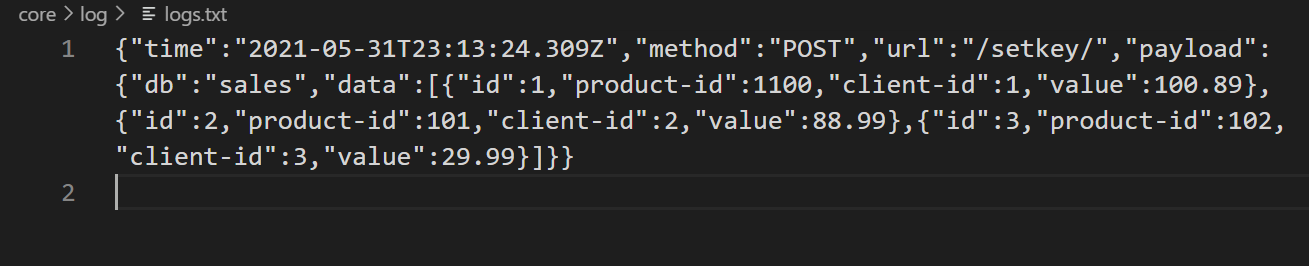
I will now make another POST request to add products to the nosqljs in-memory database.
{
    "db": "Product",
    "data": [
        {
            "price": 199.99,
            "date": "2021-01-01 10:10:10"
        }

    ]
}
Since we are making a request that also matches our Product table in the mysql database, our middleware will intercept the request and add it to the database as well.

Our db.json file should have another key added to it matching the db value of our POST request.

Our log.txt file should have now one more line that matches our POST request.
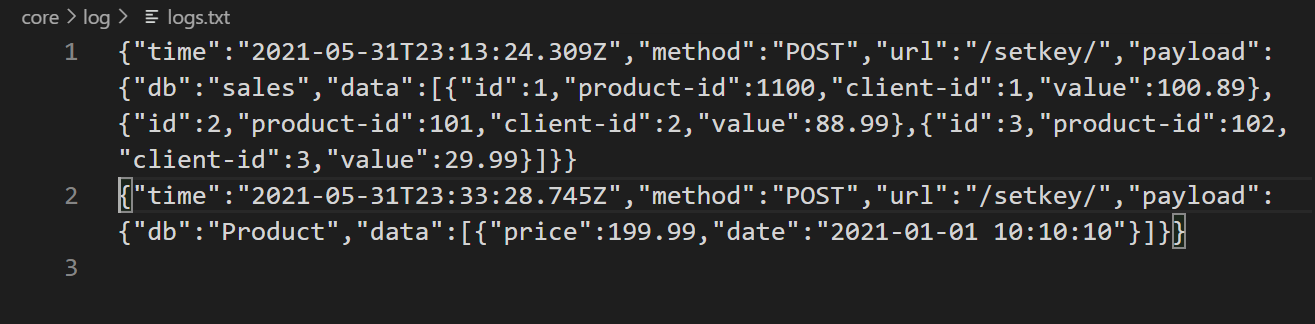
If we check our database we should have exactly one registry their with the same values of our request.

If you are starting NoSQL.js server with a database that have some data in it, like we now have, all you have to do is configure your connection in the conn.js file in the repository folder and enable the mysql property of the config file by setting its value to true. When you start the server you should have all of your db records loaded into it. Any POST request should now update both your in-memory database and mysql. This is how our db.json file should look like if we are just starting our NoSQL.js server.

To be able to use it in your application all you have to do is make a GET request to the /sales or product endpoints:
http://localhost:7700/getkey/sales
Suppose you now want to change a product price. You can make a PUT request to the /product endpoint like that:
PUT /updatekey/product HTTP/1.1
Host: localhost:7700
Content-Type: application/json

{
    "id": 1,
    "product-id": 100,
    "client-id": 1,
    "value": 18.89
}
One thing to note here. The system will make a match of your product id and will update all its content based on this payload. So if you provide a different json structure with additional properties it will be accepted here.
Let´s suppose our system crash and the database get restarted from docker or kubernetes and that the db.json is saved outside the container. What do you think you will get back from the api? Let´s find out by making another GET request to it!
http://localhost:7700/get
You should get a response with all of the data as you had before. This is because all changes are saved in a local json file so you can restore it later exactly as it was before if you need it.
So, how can we make a DELETE request? We have two choices here. Delete a single record from the table or delete the table itself from the database.
To delete a single record we just need to make a DELETE request to the desired endpoint passing the id of the record you want to delete as a path parameter, like this:
DELETE /deletekey/product/1 HTTP/1.1
Host: localhost:7700
If however you want to delete the entire database table from the memory, you make a DELETE request to its endpoint:
DELETE /deletekey/product HTTP/1.1
Host: localhost:7700
Please do not delete your table from your relational database. At least not before making sure you have a backup of it!
All commands used in this post
docker run --rm --name mysql -e MYSQL_ROOT_PASSWORD=123456 -d -p 3307:3306 mysql:5.7

docker exec -it mysql bash

mysql -u root -p

CREATE DATABASE products;

USE products;

CREATE TABLE Product (
    id int NOT NULL AUTO_INCREMENT,
    price float,
    date datetime,
    PRIMARY KEY (id)
);

docker build -t cjafet/mysql .

docker run --rm --name mysql -p 3306:3306 cjafet/mysql

./node_modules/mocha/bin/mocha

node ./server/nosql-server.js
Next steps
Improve project documentation, increase the number of tests integrate PostgreSQL, analyze the need of individual json files. Some tests have already been made with it.GitHub Repository
https://github.com/cjafet/nosqljs
Comments
Post a Comment